25afbf
Facebook Pinterest Instagram Teachers Pay Teachers Blog Lovin' Image Map
Showing posts with label 1:1. Show all posts

Thursday, August 27, 2020

Live Virtual Lessons: 3 Act Tasks

 This week is all about ways you can engage your students during your math virtual lessons. In a typical year, 3 Act Tasks are a huge part of my daily class math meetings. You can read all about how I use them in this blog post: https://www.teachingredefined.com/2019/08/math-workshop-using-3-act-tasks.html

But I wanted to take some time to talk to you about how this would work in a virtual setting. Obviously, things aren't going to go exactly the same way, but that doesn't mean you have to shy away from your usual resources/lessons. 

So watch the video below to hear how I plan to use 3 Act Tasks in my virtual math lessons: 


Leave a comment and let me know what you think about using 3 act tasks in your virtual lessons. What questions or concerns do you have about the technology? I'm here to help!

Wednesday, August 26, 2020

Live Virtual Lessons: Place Value Games

 This week I'm sharing quick and easy ideas for your math live virtual lessons. Today's video is all about using a simple place value game called "The Greatest Number". 

Watch the video below to learn how to play the game and how to incorporate the game into your virtual lessons. 


Be sure to follow me on Instagram @teachingredefined for more ideas for your virtual/hybrid/social distanced classroom. I promise to continue to bring you great ideas in a chaotic toddler-filled setting ; )

Leave a comment and let me know what your virtual lessons will look like!

Sunday, August 9, 2020

Introducing Video Lessons

 This school year many teachers will find themselves using video lessons for the first time. Some will be teaching entirely online, while others will be using video lessons in combination with in-person teaching. 


I started using video lessons as part of an in-class flip for my math workshop back in 2013. I get asked all the time about implementing video lessons and my biggest piece of advice is to be intentional about how you start the year. Just like we set clear expectations for other parts of our school day, we need to set clear expectations for video lessons. 


Usually I introduce math workshop (which includes video lessons) during the first week of school, often on day 2or 3. We start with a concept that is related to our first topic, but is a review skill. For example, we usually start the year with place value so I’ll begin by reviewing 6-digit numbers (a skill they learned the year before). This way we can focus on the process of workshop without the added challenge of new content. It’s also a great way to get them thinking about math again. 


The first day that we watch a video lesson, I gather the students on the rug and play the lesson for the whole class. As I play the lesson, I pause and model my thinking as I complete the notes page that goes with the video. The kids fill in the notes page along with me. 


After we watch the video and complete our notes page, we review the process. What did they notice about how I watch video lessons? As we debrief/discuss I create an anchor chart for video lessons. A lot of times this takes the format of a t-chart with the headings “looks like”/”sounds like”. 


The second day we do a video lesson, I start by having the class gather on the rug and we review the anchor chart for watching video lessons. Then we walk through how they will find the video and again go over my expectations (wear headphones, taking notes as you watch, pause when you need to, rewind if you need to, etc.). I then send them off to watch the video while I circulate the room giving reminders when needed. After everyone is done, we come back to the rug and debrief again. 


Okay great, that’s a normal year. So what about if we’re learning virtually?? 


My school will be utilizing a lot of live lessons, but even though there will be live lessons there will still be times when kids are watching a video (or a replay of the live lesson) and I want to set clear expectations for both live virtual lessons and recorded lessons. 


I plan to follow much of the same process as I’ve done in person. I will model and “think aloud” what I expect. For recorded lessons, I plan on showing a video through my screen share and modeling for students what they should be doing when they watch a video lesson. 


Want to know more about how I launch math workshop? 

Check out my launching math workshop series


Need more information on video lessons/flipped models? I have a *free* course that will teach you everything you need to know. Check it out here


Sunday, August 2, 2020

Blended Math Workshop

I’ve been doing a lot of thinking about what math workshop will look like this year. Is it even possible? There are still so many unknowns, even as the start of the school year quickly approaches.


For my school, the *current* plan (seems to change by the day) is to start the year virtual for 3 weeks and then offer both in-person and virtual learning. Parents will choose the model they want for each 9-week grading period. 


In-person learning will also look very different with students staying apart from each other, no sharing of materials, and wearing masks all day. 


While I am certainly no expert in how to teach in a socially distanced classroom or an entirely virtual one, the blended workshop model I’ve been using for years (which includes video lessons) makes this challenge a little less overwhelming. 


Click below to watch my video where I discuss my typical blended workshop model along with thoughts and ideas for the current school year. 


After you watch, leave a comment with what your year will look like and your biggest challenges with incorporating math workshop.

Wednesday, July 10, 2019

Everything You Need to Know to Flip Your Class

I've been flipping my 4th grade math class for about  years now and I can honestly say it's completely changed the way I teach.

I love sharing how I flip my class with other teachers and I always get asked a lot of questions.
What does a flipped class even mean?
When do you have kids watch videos?
Where do you get your videos?
How do you know your students are paying attention? 

That's why I decided to create this *free* video course on how to flip your class. 

Click the picture below to sign up now!


This email course consists of 4 videos where I walk you through everything you need to know to start flipping your own class.

I'll cover Flipping 101
- What is a flipped class?
- Why do I flip my class?
- What does my flipped math class look like?

You'll learn All About the Videos
- How do you make videos?
- Where can you find videos?
- How do you choose a good video for students?


I'll tell you how to Hold Students Accountable
- How do you know students are paying attention?
- How can you have students reflect after lessons?

Finally, I'll help you Put It All Together
- I'll give you bonus tips and tricks to make your life easier
- I'll show you what one of my flipped lessons looks like so you have an example


Sunday, January 29, 2017

Tech Tools: Popplet

Tech Tools is a series where I highlight an app or website I'm currently using in my classroom. All apps or sites are free at the time the blog is published. (They may include an upgrade option). I am not affiliated with any of these apps or sites - just a fan from using them myself!

Techie Level: Beginner

App or Web: App (iOS) with web option

What is it? Popplet is a mind mapping app. It is a great tool for brainstorming and allows students to add text or images.

How have I used it? I especially like using Popplet to have students compare concepts using a "Double Bubble" thinking map, which is a lot like a venn diagram. I'm including a picture below of a student's comparison of mixtures and solutions

Student example:

Want to know more? Check out Popplet's site for more info., a demo and a link to download.

What do you think? Comment below and tell me how you've used this app before or how you plan to try it out in your class!
This blog series highlights FREE apps and sites to use in your upper elementary classroom. Perfect for teachers trying to find meaningful ways to integrate technology and take student thinking to the next level.

Sunday, January 22, 2017

Mastering Multiplication

We just finished up our unit on the 4 operations. When I am introducing multiplication and division with large numbers, I first focus on the skill. Then we follow up the skills with an in-depth problem solving unit.

One of the first skills I teach is multiplying large numbers by a 1-digit number. Our standards in Texas include multiplying a 4-digit number times a 1-digit number. This is an important skill because it builds on their knowledge from 3rd grade (2-digit times 1-digit) and lays the foundation needed for 2-digit times 2-digit - which comes next in our curriculum.

We spent a week on multiplying by 1-digit numbers. All of the activities that my kids did were in a Google Slide that I shared through Google Classroom. They worked through the following activities at their own pace:

They started with a video lesson, while completing a student anchor chart. The completed charts go in their math binder.

After the video lesson, they completed a sort. The sort was multiplication problems. They solved them on white boards and then sorted them by odd products and even products. {My kids LOVE to work problems out on white boards!!}

Next they used a deck of cards to create 10 multiplication problems that they solved on white boards and *their favorite part* got to check with a calculator. What! You let your kids use a calculator?? Yep! It keeps them motivated and they have to go back and find their mistake if they see that they get the problem wrong. We also spend a lot of time discussing why they really need to do the work on their own and use the calculator to check.

Finally, they complete a set of task cards. There were 10 task cards. I posted each card around the room. They walked around the room with a white board to work the problems. Then they posted their answers to a Google Form that automatically graded all their work. With a click of a button I could see which kids needed more help before their Friday math quiz (hallelujah!).

My kids love having their assignments in Google and having the freedom to work at their own pace. It also helps me pull students in small groups throughout the week.

More visual? Here's a quick glimpse of the Google slides.


Want to try it in your room? You can get all the materials I used in my Teachers Pay Teachers store. Just click the picture below!

Need white boards for your class? You can find some on Amazon that are pretty affordable. This set has a good reviews (this is an affiliate link)

Tuesday, January 17, 2017

Tech Tools: iBrainstorm

Tech Tools is a series where I highlight an app or website I'm currently using in my classroom. All apps or sites are free at the time the blog is published. (They may include an upgrade option). I am not affiliated with any of these apps or sites - just a fan from using them myself!

Techie Level: Beginner to Intermediate (depending on which functions you use)

App or Web: Currently an app for iPads

What is it? iBrainstorm is a mind mapping app. It has templates, but also allows for free form brainstorming. Additionally, you can collaborate with other iPads on one brainstorming session. 

How have I used it? I've used it a lot at the beginning of science units for students to brainstorm what they already know about a topic. We use Thinking Maps at our school and I love that iBrainstorm has the templates to match Thinking Maps. When they're done, students take a screen shot and upload to a Google Classroom assignment. 

Student examples:
I love how different these student samples are - kids always think of things differently than I do!


Want to know more? Check out iBrainstorm's site for more info. and a link to download.

What do you think? Comment below and tell me how you've used this app before or how you plan to try it out in your class!
This blog series highlights FREE apps and sites to use in your upper elementary classroom. Perfect for teachers trying to find meaningful ways to integrate technology and take student thinking to the next level.

Sunday, August 14, 2016

Going Digital with Google: Student Portfolios


The last two years I piloted student portfolios for my district. After some trial and error, what we found to work best for student portfolios in upper elementary school was to use Google Slides.

Our grading period is made up four 9-week periods, so we had our students select a piece of work for each grading period. My district really emphasized that students should have ownership of their portfolio. We talked a lot about how to choose quality work, but at the end of the day the kids had complete freedom to choose something they were proud of.

We created a template for students - you can check it out here. At the end of the 9 weeks the students selected a work sample. Many times this was something digital that they already had saved in Google Drive. If they selected something that was on paper, they took a picture of it. Then they had to reflect on why they chose that piece of work.

The whole process didn't take more than 30 minutes and at the end of the year, they had a collection of 4 meaningful pieces of work. It was great to share at Open House and spring conferences.

Sunday, July 24, 2016

Going Digital with Google: Google Slides (plus a link up!)

If you've been following along for a while, then you know my math workshop has been digital for the last 2 years. You also know that I've been using a website called Blendspace to house my math workshop directions. I even did a blog post you can check out.

I thought Blendspace was the greatest thing ever. And it still has some redeeming qualities, but it also had some downfalls. Like some days the site was reeaaaally slow to load. When I included sites to visit within blendspace it was a bit glitchy on the ipads. My class didn't have usernames so they were still recording work other places and both the kids and I were constantly clicking back and forth.

Now let's fast forward to January 2016. I discovered a great group of teacher-authors on Teachers Pay Teachers who introduced me to using Google Slides in place of Blendspace. Now I knew all about Google. My kids were using Google Drive to back things up and we used Google Classroom. That being said, it had never crossed my mind to use Google Slides in a new way!

So here are my top 3 things I love about using Google Slides for math workshop.
stay with me people, there's a link up at the bottom : )

#1
I can house EVERYTHING in one place. My directions are in slides. Any links or videos are in slides. Ask a reflection question? They type their answer right on the slide. Building something with manipulatives? Take a picture and (you guessed it) put it right on the slide. Seeing a theme here? This was a game changer folks. For me and the kids. In fact, when I asked what they liked about Google Slides, the #1 thing was no longer having to click back and forth or keep up with separate papers. 

#2
It works seamlessly with Google Classroom. I love that I can click the magical make a copy for each student button and voi la! Every kid has their own editable copy. Huge time saver! Google Classroom also automatically backs everything up to their Google Drive so it's a built in student portfolio. 
 What in the world is Google Classroom?! Read about it here

#3
I love that using Google Slides is teaching my kids valuable computer skills. These are skills that I think they will carry on for many years. Sometimes I forget that I need to teach them basic skills because they seem so tech savvy. 

Yeah that all sounds great, but what does it really look like?? Here's a sneak peek into my latest Google Slide on Comparing and Ordering numbers.

Congrats! You made it to the end. As promised...here's a fabulous link up hosted by Mrs. Beers, Danielle Knight and The Daring English Teacher for Innovative Classroom Learning Day. Check out the links below to find other blog posts and digital products to check out.

Leave a comment and let me know how you plan on using Google in your classroom this year!


Tuesday, July 5, 2016

Going Digital with Google: Google Forms for Quizzes


One thing I love about Google is that they are constantly updating their apps. They just released an update that makes it even easier to use Google Forms for quizzes.

I made a video tutorial to show you how easy it is to create, score & analyze quizzes using forms.
Click on the video below to learn more!

Sunday, January 24, 2016

Going Digital with Google: Google Classroom

This is my 2nd post in my Going Digital with Google series. Check out my first post to find out how I use Google Forms to assess my students.


This post is all about Google Classroom. This is my first year using Google Classroom with my 4th graders. Last year we used Edmodo, which I liked. There are some pros and cons to Google Classroom that I'll share with you below.

If you're brand new to Google Classroom, I'd suggest searching YouTube for some videos that explain what it is and how to set up your classroom and get started. This is a great video to help you get started.

Pro #1:
Classroom works *almost* seamlessly with Google Drive. One of my favorite aspects of Google Classroom is that I can create an item in Google Drive - using docs, slides, or sheets. Then I can create an assignment in Google Classroom and upload that item. There is the option to have Classroom automatically make a copy for each student. Y'all that's amazing. No more having kids mess up your original document. Classroom even names the document with what you titled it and the kid's name. AND it's automatically added to their Google Drive.

Con #1:
This goes along with what I love about Classroom. If your students use iPads, like mine do, they will encounter some glitches. My kids access Classroom through safari, as opposed to the app, per district request. They also have the Drive app and the apps for Docs, Slides & Sheets. Let's say I uploaded a Google Doc for each student to edit, the kids will click on the link for the doc in classroom. Then the ipad inevitably freaks out because it's unsure of whether to open the drive app or the docs app. At first, this made us freak out too! Now the kids - and myself - are used to the fact that they need to be patient and let the ipad do it's thing. If it doesn't do it's thing correctly, they can still find the doc in their docs app. I know this sounds a bit confusing, but if you try it out on the ipad you'll know what I'm talking about.

Pro #2:
When I make an assignment, the kids are able to virtually turn in the assignment. There are some cool features here. I can quickly see who is done & who isn't. I can enter a grade & return the assignment to students. I can view the grades in a Google Sheet. I can also open a Google Drive folder with all of their assignments in it. No more lugging home giant bags filled with papers to grade, I can do it all from my laptop!

Con #2:
When I used Edmodo, I was able to create groups within my classroom. I was also able to assign things to a select group of students. As of right now, that's not an option in Google Classroom. I've been able to work around it a little bit. For example, during my RTI time I have students working on some independent study projects. I created a google doc for the different independent study groups. Then I shared the doc with the students in that group. They went to it straight from Google Drive, instead of going into Classroom. I've heard rumors that this con is on Google's radar, so hopefully an update will be coming soon.

Pro #3:
Sometimes I just need to share a link with my students, but it's not anything they'll need to turn in. Classroom has assignments & announcements. Assignments have a button for students to submit, announcements don't. I use announcements to share links, directions, or anything else that doesn't require students to turn work in digitally.

Pro #4:
When students turn in a Google Doc/Slides/Sheets/etc. they lose the ability to edit it. This means that they are no longer able to make changes to the assignment after they've turned it in. I like this feature. I've also discovered that if they unsubmit, they can go in and make changes and then turn it in again. This comes in handy when they turn it in, then realize they messed something up.

All in all, I've been really pleased with using Classroom. My 4th graders have figured it out very quickly and it's become our 1-stop place for all things in our class. Stay tuned to this series to find out more about how I use Google Docs, Slides & Sheets in my classroom. 

Wednesday, January 20, 2016

Going Digital with Google: Google Forms for Assessing

Have you caught the Google Bug?? I have! We are using Google in new ways everyday in my 4th grade classroom. This is the 1st post in my Going Digital with Google Series.

Read on to find out how I'm using Google Forms for quick math assessments.


In the past, I've used Google Forms for surveys, but that's pretty much it. Then I discovered Flubaroo - a free Google extension. Flubaroo will automatically grade your Google Forms. 

I like to use Google Forms for quick, formative assessments.You could use them for any type of grading assignment - they work best with multiple choice questions or questions where there is only 1 right answer. I prefer to have the kids answer with a number so I don't have to worry if they spelled it wrong.

I'm going to walk you through how I create a form and use flubaroo to grade it. I made a quick, sample quiz - you can check it out here: http://goo.gl/forms/QOHInO085U

To get started, you need to be logged into Google Drive. You're going to want to create a new Google Form. As of right now, the add-ons are only working in the old version of Google Forms, so you'll want to stay in that.

Once you create the form, you'll be able to add your questions.

Some tips:
  • Make sure that your questions are all required so they don't accidentally submit the form before they're done. 
  • You can reorder the questions by dragging them around after you're done adding.
  • Make sure to have a question for the students to type their name. 

When you're finished, you'll want to share the link with your students. I copy the link into Google Classroom, but you could share it anyway you're already sharing links with students (including QR codes). 


Next, you're going to need to "view live form" and complete the form yourself. This will create the answer key. I always put "Answer Key" for the name question.

Once the form is finished, click on the option to "view responses". This will take you to a spreadsheet.
  • It bothers me when the text runs over the boxes - to fix this, select the boxes, then go to format -> text wrapping -> wrap text

Now you're going to add Flubaroo. This next step you'll only have to do the first time. You're going to click on add-ons -> get add-ons


Type Flubaroo in the search box & click free to download. You'll also have to click "allow" on the next screen that pops up. 


Now go back to the spreadsheet, click "add-ons" -> Flubaroo-> Grade assignment


 Flubaroo will walk you through the next steps. You can decide if you want to grade every question and if you want to grade them equally.

Then you'll select which response to use as the answer key. This is where naming it "answer key" comes in handy : )


Once you're done, Flubaroo will create a new page in the spreadsheet for you. Here's an idea of what it looks like (with fake entries). Not only does it show you the grade, but also how the students do on each question & if there are trends. You can even create graphs to go along with your data!


Another option is to have Flubaroo email students their grades - for this you'd have to include a question where students type their email address. I've used this option with kids, and they love being able to get such quick feedback!

I know this seems like a lot of steps, but once you get the hang of it, it's very quick - much quicker than grading 40 (or more) papers!

Sunday, January 17, 2016

Solving Word Problems in a Digital Classroom

Last year I spent a couple of weeks teaching my kids how to analyze word problems. You can read all about my lessons here .


This year I did the same lessons, with a digital twist. I am really trying to incorporate more digital activities now that I'm in my second year of going 1:1 with students to iPads. 

The first day of our problem solving unit, we created a key words chart. Last year, I had the kids write on a a recording sheet like this:

This year I created the recording sheet in Google Docs and shared it with my student in Google Classroom. In Google Classroom you are able to make a copy of a Google Doc for each student. As we acted out word problems using manipulatives, we added to the Google Doc. The students each added to their own chart - this kept them more engaged than if they watched me create the chart. Now instead of having a copy in their math journals, they have a copy in Google Drive. 

On the second day of the unit, I had students sort word problems by the 4 operations. They had to write a number sentence and an explanation for each problem. Last year it looked like this:

This year instead of using paper/pencil, the kids took pictures of the word problems and put the number sentence and explanation into a pic collage. So now it looked like this:

Now, not everything lends itself to a digital activity. Sometimes I still need my students doing paper/pencil activities. However, when I'm able to make something digital I see an increase in engagement and ownership. The reduction in copies and paper is an added bonus. 

How do you incorporate digital activities into your math block?

Interested in my word problem lesson plans? The first 3 days are available in my Teacher Pay Teacher store:

Tuesday, September 29, 2015

Giving kids choices

One of my favorite ways to keep my students engaged is to give them choice. Sometimes I over think this concept. I try to find small ways to incorporate student choice in our daily activities.

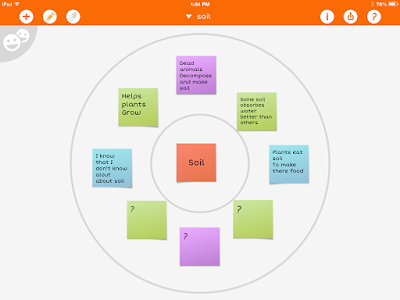
Today in science we started a new unit on soil. I wanted the kids to brainstorm what they already knew about soil. My plan was for students to make a graphic organizer - we use thinking maps at my school. I told them they could make a bubble map or a circle map (2 organizers that include a topic in the middle with facts surrounding it). The kids had a choice of using paper/pencil or any app they had on their ipads. I'm always amazed by how creative the kids can be - I'm also amazed at how different they are!

Here are some samples of what they came up with. You'll notice they're all very different, but they also achieve the same purpose.


I love that each student got to let their personality and unique learning styles show. How do you incorporate student choice into your classroom?

Sunday, September 20, 2015

Digital Number Lines & Rounding

This week my kids are learning to round large numbers. I really want them to understand rounding and not just memorize tricks. In the past I would teach my kids a poem, and while they could round, they didn't really understand why.

Since my classroom is digital, I'm always looking for ways to use our ipads for our math workshop activities.

I found this *free* app called Number Line.


My kids are going to use this app to practice rounding some larger numbers. They'll take screen shots of each number they round and then put them together in pic collage. I made a video to show them how they'll be using the app for the activity.

Check it out:


Here's an example of one of my student's finished products:


How do you teach your kids rounding?

Sunday, September 13, 2015

Launching Math Workshop, Part 4


Just joining in? Check out the rest of this blog series!

Read on to find out what day 4 of math workshop looks like.

By day 4, I'm just excited that I've made it to the end of the first week! I'm also amazed by how well my kids are doing with math workshop. The structure is very different than what they're used to and there's a lot for them to figure out.

Day 4 is all about creating workshop rules & becoming independent.

Before the kids start working, we create an anchor chart on our math workshop rules. The class helps decide on the rules based on their experiences throughout the week. Of course I forgot to take a picture of our anchor chart...

Our rules focused on working the whole time, using math tools appropriately (tools, not toys), working together (helping, not giving answers), problem solving, and reading the directions (I really try to make a big deal out of this one). 

Once we've reviewed the rules and the structure of math workshop, I have the kids hold up a number to show me what box they are on in our blendspace. (Wondering what blendspace is? Check out this post).

Then we spend the rest of the time working on finishing up the activities. Here are a couple of pictures of my kids hard at work.


You can find all of the activities my kids did, including the video, in my Teachers Pay Teachers store.


That ends my week of launching math workshop! Over the next couple of weeks I'll be reinforcing routines with students and helping them understand where and how to turn their work in. By the 3rd week, I'll start pulling my guided math groups. 

Tuesday, September 1, 2015

Launching Math Workshop, Part 3


If you missed the first 2 parts of the series, you can check them out here:

Read on to find out what the 3rd day of math workshop looks like.

Day 3 is all about gradually releasing responsibility

I start off by having the kids talk about what we did the day before in math workshop. Through our discussion, they remember that we use the website blendspace and that they watched a math video. 

Wondering what the heck blendspace is? Check out this post

Then I let them know that today they'll be watching the video on their own. 

We are using Google Classroom this year, so I shared the link to the blendspace with my classes through that website. So to start off, the kids get onto Google Classroom and we walk through finding the blendspace. 

Once everyone has found the instructional video (included in their blendspace), we quickly review our anchor chart on watching videos. Then, they grab their headphones, spread out & get started. 

I walk around while they're watching the videos and make sure they're:
1. actually watching it
2. not experiencing any technical difficulties
3. remembering to complete their anchor chart

For today, I have them go back to their desks and read a book when they're finished. Once everyone has finished, we glue our charts in their journals and quickly review how the process went. I was pleased to see how much the kids enjoyed watching the videos. 


Then we looked at the directions for the next activity together. I model what the activity will look like and where they will find the math tools. We don't spend a lot of time talking about the rules for workshop yet. That will come tomorrow.

Once everyone understands what they need to do, they spread out again and get started on the activity. The activity they did was using place value blocks to build a number. Then they took pictures of each number and put them into PicCollage. Finally, they added the expanded notation for each number into their collage. 


Not everyone finished, but that was okay. I let them know that they will always have 2 days to work on the activities in each blendspace. 

Thursday, August 27, 2015

Classroom Scavenger Hunt

It seems like every year in the spring, I still have kids asking me where things are in the classroom. How can they not know where the trashcan is by March?!

I always start off the year by giving a tour of the classroom, but I realize now that they're trying to take in so much information those first few days that they just can't remember it all.

This year is different! This year one of our first week activities was a ...
Classroom Scavenger Hunt

First I decided on the most important things in the classroom. These are things the kids will use an almost-daily basis. I tried not to pick too many things because I really wanted them to remember where everything was! I also didn't want the activity to take forever...

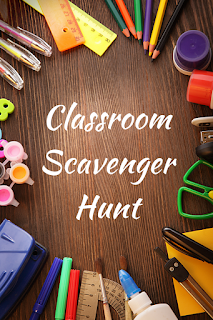
You can see my scavenger hunt below. If you click on the picture, you can download a free copy and edit it to fit your classroom.
Classroom Scavenger Hunt

I paired my kids up and had them work together to find each item. I didn't make it a competition. This early in the year, I really don't know my kids well enough to know what they can handle. I was a little wary of sending them loose around the classroom in a race : )

I'm very lucky to teach at a school where each student has their own school-issued ipad. We get started using them right away, so I wanted to include a digital aspect to my scavenger hunt. I had the kids take a picture of each item in the scavenger hunt. They put them all together in the free app: Pic Collage Kids. This is an app we'll use all year and most of my kids are already familiar with it. Again, since it's so early in the school year I try to keep things fairly simple.

In my free download on Teachers Pay Teachers, I also included some other digital ideas.

Classroom Scavenger Hunt

Now when my kids ask me where the trash can is in March, I can kindly redirect them to look at their Pic Collage.

How do you help your kids learn their way around your classroom? Comment below!

Saturday, August 22, 2015

Launching Math Workshop, Part 2


If you missed part one of this series, be sure to check it out here to find out what I do on the first day of math workshop.

Read on to find out what the 2nd day of math workshop looks like.

For me, day 2 is all about *modeling*.

I start off by briefly explaining to the students what math workshop will look like this year:
- We'll use the website blendspace for their directions 
- They'll watch an instructional video for their lesson
- I'll be pulling groups every day

Then we pull up our first blendspace. Since our 1st unit is place value, I introduce workshop with a place value review.

You can find the blendspace here.

Every blendspace will start with a video. I've found my kids focus better watching a short video than they do with the distractions of a whole class mini-lesson. I can also get the information across in a shorter time in a video. 

I'll show the video whole class and we'll pause the video and fill out our anchor charts together. (I make a student copy of the anchor chart for each video). I do lots of "think alouds" during the video and make sure the kids really understand what's expected of them while they're watching an instructional video. 

After we've all completed our anchor charts & glued them into our journals, we make an anchor chart on watching instructional videos. 

Then I have the students think-pair-share what they think they'll be doing for the next activity in the blendspace. They work on the 2nd activity, which incorporates their iPads, on their own. During this time I walk around the room & provide feedback. 

Once everyone has finished, we come back together and discuss the next activity in blendspace. Again, they complete it on their own as I walk around the room. 

Once they're finished, we come back together and discuss things that went well & things that need to change for the next day. 

I tried to choose activities that all students should be able to complete independently, even if they're below level. 

You can download all of the materials for these activities here for FREE.

If you like these activities, be on the look out for more digital math stations in my Teachers Pay Teachers store!