Last month I wrote a post about how my kids were using the Number Line app to help with rounding - you can check out the post here.
Using an app is always a great way to give kids practice with math concepts, but it does not replace the time they need with concrete, hands-on materials. I really try to stick true to the process of concrete--> pictorial --> abstract. The number line app was pictorial practice for the kids.
I made sure to give them some concrete experiences during our guided math lessons on rounding.
I started my guided math lessons by activating their prior knowledge on rounding. They played a matching game with smaller numbers. They worked together to find all the matches. This got them talking and thinking about rounding.
Next, we spent some time working through a guided practice page together, using a number line in a clear sheet protector and a counter.
We read through the problems together and then used the number line to help us round. The number we were rounding went on top and then we set up our number line, depending on the place we were rounding to. Finally, we placed the counter on the number line to represent where our original number would go.
This was a lot more difficult for some students than I was anticipating. They really struggled to figure out what numbers should go on the number line, and they also had trouble placing the counter. You can see that student had the counter much closer to 15,000 than it should be.
After lots of discussion, we would then slide the counter over to the number it would round to.
Finally, they had to do a few problems on their own for me to check for understanding.
If you're interested in using these ideas in your classroom, you can download my Guided Math Plans for Rounding Whole Numbers - it's available in my Teachers Pay Teachers store
Showing posts with label Guided Math. Show all posts
Sunday, November 1, 2015
Sunday, September 13, 2015
Launching Math Workshop, Part 4
Just joining in? Check out the rest of this blog series!
Read on to find out what day 4 of math workshop looks like.
By day 4, I'm just excited that I've made it to the end of the first week! I'm also amazed by how well my kids are doing with math workshop. The structure is very different than what they're used to and there's a lot for them to figure out.
Day 4 is all about creating workshop rules & becoming independent.
Before the kids start working, we create an anchor chart on our math workshop rules. The class helps decide on the rules based on their experiences throughout the week. Of course I forgot to take a picture of our anchor chart...
Our rules focused on working the whole time, using math tools appropriately (tools, not toys), working together (helping, not giving answers), problem solving, and reading the directions (I really try to make a big deal out of this one).
Once we've reviewed the rules and the structure of math workshop, I have the kids hold up a number to show me what box they are on in our blendspace. (Wondering what blendspace is? Check out this post).
Then we spend the rest of the time working on finishing up the activities. Here are a couple of pictures of my kids hard at work.
You can find all of the activities my kids did, including the video, in my Teachers Pay Teachers store.
That ends my week of launching math workshop! Over the next couple of weeks I'll be reinforcing routines with students and helping them understand where and how to turn their work in. By the 3rd week, I'll start pulling my guided math groups.
Saturday, August 22, 2015
Launching Math Workshop, Part 2
If you missed part one of this series, be sure to check it out here to find out what I do on the first day of math workshop.
Read on to find out what the 2nd day of math workshop looks like.
For me, day 2 is all about *modeling*.
I start off by briefly explaining to the students what math workshop will look like this year:
- We'll use the website blendspace for their directions
- They'll watch an instructional video for their lesson
- I'll be pulling groups every day
Then we pull up our first blendspace. Since our 1st unit is place value, I introduce workshop with a place value review.
You can find the blendspace here.
Every blendspace will start with a video. I've found my kids focus better watching a short video than they do with the distractions of a whole class mini-lesson. I can also get the information across in a shorter time in a video.
I'll show the video whole class and we'll pause the video and fill out our anchor charts together. (I make a student copy of the anchor chart for each video). I do lots of "think alouds" during the video and make sure the kids really understand what's expected of them while they're watching an instructional video.
After we've all completed our anchor charts & glued them into our journals, we make an anchor chart on watching instructional videos.
Then I have the students think-pair-share what they think they'll be doing for the next activity in the blendspace. They work on the 2nd activity, which incorporates their iPads, on their own. During this time I walk around the room & provide feedback.
Once everyone has finished, we come back together and discuss the next activity in blendspace. Again, they complete it on their own as I walk around the room.
Once they're finished, we come back together and discuss things that went well & things that need to change for the next day.
I tried to choose activities that all students should be able to complete independently, even if they're below level.
You can download all of the materials for these activities here for FREE.
If you like these activities, be on the look out for more digital math stations in my Teachers Pay Teachers store!
Stay tuned for part 3 - gradually releasing responsibility to students!
Wednesday, August 12, 2015
Launching Math Workshop, Part 1
I'm super excited about my plans for launching math workshop this year! So excited, that I'm starting a new blog series to explain it all to you!
Last year I went way out of my comfort zone with the structure of my math workshop. It also happened to be my first year in a completely digital classroom - meaning that each kiddo had their own ipad.
You can read more about how my digital math workshop went last year here.
It went pretty well, but I definitely think with the right amount of planning, this year will go better. Last year I pretty much threw my kids to the wolves... I quickly explained the structure and then let them have at it. While there were some advantages to letting the kids problem solve their way through workshop, I definitely didn't set clear enough expectations (which I paid for later in the year).
So that leads me to this year. I'm going to be MUCH more explicit in how I explain and model math workshop.
Over the next few weeks, I'll share with you each step of launching math workshop in the upper elementary classroom, starting with the first week of school. My math workshop is very digital, however you could use the same steps for any classroom!
I start launching math workshop on the 2nd day of school.
Our first math unit this year is place value, so while I'm teaching the routines of workshop I'm also trying to fit in some place value review and instruction.
So on day 2 of school, I have the kids take a place value pre-test. You could start day 1 if you're super ambitious : )
The pre-test covers skills from 3rd grade and the new skills they'll learn in 4th grade. I really stress to the kids that this is not for a grade and helps me know what they remember or already know. Click on the picture below to download the pre-test I use for free.
I'll use the data from this pre-test later when I start pulling guided math groups (more on that in a later post).
This also gives us a chance to discuss what the classroom looks like and sounds like during independent work.
Once everyone has finished their pre-test, we set up our math journals. In the past I've had kids create their own table of contents. This year, I'm giving them a template to glue into their journals. Maybe this will keep them neater...
We glue in the table of contents, number the pages in our journal and then add our very first entry: "Place Value Review".
This year I'm going to try having the kids color code their math journals. All the entries on place value will be in one color in the table of contents and then when we switch units, they'll switch colors.
You can download my table of contents template from Google Drive here.
We'll also spend some time discussing our math journals - where we keep them, how we use them, what they should look like, etc.
There you have it - day 1 of launching math workshop!
Next up: introducing kids to blendspace (the website we use for workshop) and instructional math videos
This also gives us a chance to discuss what the classroom looks like and sounds like during independent work.
Once everyone has finished their pre-test, we set up our math journals. In the past I've had kids create their own table of contents. This year, I'm giving them a template to glue into their journals. Maybe this will keep them neater...
We glue in the table of contents, number the pages in our journal and then add our very first entry: "Place Value Review".
This year I'm going to try having the kids color code their math journals. All the entries on place value will be in one color in the table of contents and then when we switch units, they'll switch colors.
You can download my table of contents template from Google Drive here.
We'll also spend some time discussing our math journals - where we keep them, how we use them, what they should look like, etc.
There you have it - day 1 of launching math workshop!
Next up: introducing kids to blendspace (the website we use for workshop) and instructional math videos
Wednesday, August 5, 2015
Using Manipulatives to Compare Large Numbers
I am a firm believe that older kids need manipulatives in math too! Sometimes I think people forget to make math concrete in the upper grades. However, I've found that the older kids still benefit from hands-on learning, just like in the lower grades.
Sometimes it takes a bit of creativity to figure out the best way to use hands-on materials with upper grade math. When I'm teaching my 4th graders to compare and order numbers, the numbers are too big to use place value blocks. So here are some of my favorite things to use:
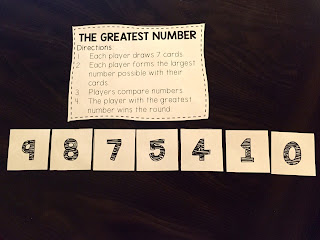
I love to use number cards. This is a game I play with my small groups. Depending on their level, the kids will draw a certain number of cards. (My higher kids will make bigger numbers) Then the kids arrange their cards to make the largest number possible. Then they all compare their numbers. I also use a deck of cards with the face cards removed for this game.
This strategy is really great for struggling students because it is so visual. I like to put place value charts in sheet protectors {click on the picture to download my FREE place value charts}. Then when we are comparing numbers, we write them in the place value chart with a dry erase marker. This helps the kids line up the numbers correctly. Next I have them place a counter on the digit that helps them compare the two numbers. In this picture, the numbers are the same up until the thousands place. Once we get to the thousands place, we can see that the top number is smaller (the counter is covering up the #8).
When I work with my small groups, I always use a checklist or observation form so I can keep track of my observations. I made an example (with made-up names) to show what they might look like. I've learned that if I don't write it down, I'll forget! It also helps me collect data for our campus intervention meetings.
What are some of your favorite manipulatives to use when you're teaching kids to compare large numbers?
Subscribe to:
Posts (Atom)